“Spring has sprung,” cries my body as it soaks up the sun streaming through my window at two o’clock on a glorious March afternoon.
It retracts the statement the following morning as I crouch, shivering to light the fire.
But, ever hopeful, it repeats the whole affair each day, confident that soon, it will be right. We are in that glorious season of acceleration, with each day accompanied by disbelief that it’s still light out this late, and that it got light so early.
As gardeners willfully ignore the frigid nights, new life is beginning in pots and planters and petri dishes all around the territory.
Petri dishes?
They are ideal for germination tests, which are a great idea for all those seeds you’ve got from previous years. A jar lid will serve just as well.
I line mine with damp paper towel and count out seeds (how many will depend on the size, but I often go for 20 or 30), cover them, and keep them damp and warm until they germinate. Count the sprouts and voilà, you no longer have to guess how thick to seed to compensate for a loss in viability.
And while you’re at it, why not sprout some to eat too?
I sprout throughout the winter to get my fresh green fix, mung beans and fenugreek being my staples. Asian greens like pak choi and mustards also make excellent sprouts, though mustards can be quite spicy, so go easy at first.
I’ve found that very small seeds like poppy seeds are not worth the trouble, and the larger beans can benefit from a light steam, even after sprouting, to improve digestibility.
A shelf above the wood stove is a great sprouting location throughout the winter, but for those who don’t have wood heat the March sun is likely creating some great windowsill environments as we speak.
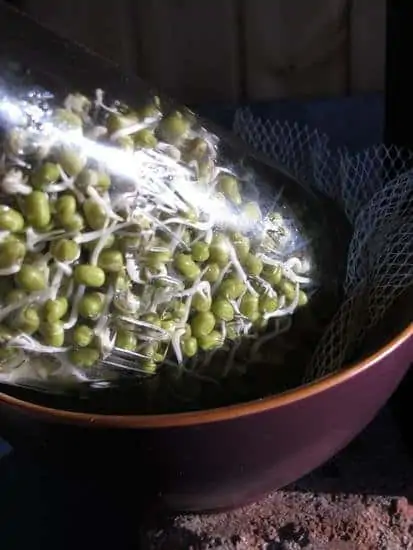
An upturned glass jar with netting over the mouth makes a great sprouter — the glass acting like a little greenhouse. Sitting the jar at a slight angle in a bowl allows moisture to drain out, but won’t dry out the sprouts. Rinsing every day helps prevent sprouts from going funky.
Different sprouts take different lengths of time to germinate, and of course time also depends on temperature. Keep this in mind if you decide to grow a wide variety, because it’s often easier to grow them in separate jars and mix them when you’re ready to eat.
Most often sprouts are eaten before the first true leaves form. Generally they are ready when the sprout is twice as long as the seed.
There are great online sources for seeds for sprouts, but if you’re just starting out, remember that any seeds are potential sprouts, including beans and peas. If you’re using seeds bought for the garden, check that they aren’t treated — organic is a safe bet.
In honor of the sun’s return, I salute the sprout.
Basic Sprouting
Put a half cup of seeds into a litre mason jar, and cover with a cup of water. Watch for the seeds to swell, which should happen within 24 hours – keep them covered with water during this period.
Cover the jar with plastic netting, for example an onion bag, that has a weave finer than the seeds if possible (for very small seeds you may want a sieve). Keep the netting in place with an elastic band or a mason jar ring. Drain the seeds and place the jar upside down at an angle in a bowl in a warm place.
Rinse the sprouts each day, and begin eating them once the tails are twice as long as the seeds. If they’re getting away on you, put them in the fridge. Use them on salads, soups, sandwiches and anywhere you need a hit of fresh green. Munch!


